January 18, 2012

 Disable/Remove the Log Off and Turn Off Buttons in Windows


Disable/Remove the Log Off and Turn Off Buttons in Windows


This tweak is very useful for those users who want to restrict the common users to shutdown public computer in common areas.  If so, you'll be glad to know that you can disable the Log Off and Turn Off Computer buttons on the Start menu.

Follow the given steps to Disable/Hide Log off button on the start menu:
To use this feature, you will need to be logged into your computer with administrative rights.

  • Disable/Hide Log Off
First Click Start Button > and then click Run.
Run box will appear.
In the Run box, type regedit and then click OK.

Then locate the following key in the registry
HKEY_CURRENT_USER\Software\Microsoft\Windows\CurrentVersion\Policies\Explorer


Click the Edit menu > New > Create a Binary value name it NoLogOff


Double click on NoLogOff and enter the number 01 00 00 00 in the Value Data.


  • Disable/Hide Turn Off Computer
Follow the given steps to disable Turn off Computer" button on the start menu:
First Click Start Button > and then click Run.
Run box will appear.
In the Run box, type regedit and then click OK.


Then locate the following key in the registry
HKEY_CURRENT_USER\Software\Microsoft\Windows\CurrentVersion\Policies\Explorer


Click the Edit menu > New > Create a DWORD Value and name it NoClose


Double click NoClose and give value 1 in Value Data.

That's all.

Search Terms: How to, How do, Disable Logoff on the Start Menu, Remove Log Off from the Start Menu at Registry Guide for Windows, Disable Power Button To Turn Off Pc, Disable the Log Off and Turn Off Computer buttons, Disable Turn Off Computer button, Disable the logoff buttons, Disable the Log Off and Turn Off Buttons in Windows, Enable/disable turn-off/ log-off option in start menu, Remove Log Off and Turn Off Computer from Start Menu, Disable/Enable Start Menu Logoff, Enable/ disable turn-off/ log-off option in start menu, Hide the Log off item from the Start Menu, Hiding log off button, Hide Log Off Button on Start Menu, Hide Shutdown and Logoff buttons, Disable/Hide the Log Off and Turn Off Buttons in Windows


CAUTION! : It is recommends that before you attempt to use the registry editor, make sure that you back up the whole registry or export the registry keys in the registry that you plan to edit. Incorrectly editing the registry may damage your system. Use Registry Editor at your own risk, we cannot guarantee that you can solve problems that result from using Registry Editor incorrectly.

Category: Registry Tweaks
Operating System : Windows

November 18, 2011

 How to Remove 81u3f4nt45y Virus


How to Remove 81u3f4nt45y - 24.01.2007 - SURABAYA Virus

81u3f4nt45y - 24.01.2007 - Surabaya It's a virus that often comes up at your booting, just exactly before the Windows Welcome Screen.

It shows this message: " Surabaya in my birthday
Don’t kill me, I’m just send message from your computer………………. '’ is a W32.Drower W32/Drowor.worm.


> First you must Disable System Restore point.

I will explain how to disable system restore :

STEP  1:  

> Click Start button.
Then Right-click the My Computer and then click Properties.
> Click the System Restore tab.
Check the box "Turn off System Restore" or "Turn off System Restore on all drives" as shown in this picture below.
> Click Apply.
When turning off System Restore, the existing restore points will be deleted. Click Yes.
> Click OK button.
When you have finished, restart the computer and follow the instructions in the next section to turn on System Restore.


STEP  2:

Disable "Adobe Online.com" and "Adobe Update.com"
How to Disable "Adobe Online.com" and "Adobe Update.com" :
Press Ctrl + Shift + Esc (Windows Task Manager)
Go to "Processes" tab and find “Adobe Online.com" and "Adobe Update.com"
If the file still available on "Processes", try "End Process Tree"


STEP 3:

After that open registry editor click Edit > Find > in the Find bar type Surabaya and click OK.
The location of any file that belong to Surabaya will be displayed for you. Delete any of them by right-clicking on the file on the dropdown menu and delete it.


STEP 4:

Repair Registry
How to Repair :
Open the Notepad
Copy and paste this code into your text editor and save with name "repair.inf" (Note : Select "All Files" not Text Documents)


Source Code

*******************************************************************************************************

[Version]
Signature="$Chicago$"

[DefaultInstall]
AddReg=UnhookRegKey
DelReg=del

[UnhookRegKey]
HKLM, Software\CLASSES\batfile\shell\open\command,,,"""%1"" %*"
HKLM, Software\CLASSES\comfile\shell\open\command,,,"""%1"" %*"
HKLM, Software\CLASSES\exefile\shell\open\command,,,"""%1"" %*"
HKLM, Software\CLASSES\piffile\shell\open\command,,,"""%1"" %*"
HKLM, Software\CLASSES\regfile\shell\open\command,,,"regedit.exe "%1""
HKLM, Software\CLASSES\scrfile\shell\open\command,,,"""%1"" %*"
HKLM, SOFTWARE\Microsoft\Windows NT\CurrentVersion\Winlogon, Shell,0, "Explorer.exe"
HKLM, SYSTEM\ControlSet001\Control\SafeBoot, AlternateShell,0, "cmd.exe"
HKLM, SYSTEM\ControlSet002\Control\SafeBoot, AlternateShell,0, "cmd.exe"
HKLM, SYSTEM\CurrentControlSet\Control\SafeBoot, AlternateShell,0, "cmd.exe"
HKLM, SOFTWARE\Microsoft\Windows\CurrentVersion\Explorer\Advanced\Folder\HideFileExt, UncheckedValue,0x00010001,0
HKLM, SOFTWARE\Classes\scrfile,,,"Screen Saver"

[del]
HKLM, SOFTWARE\Microsoft\Windows NT\CurrentVersion\Winlogon, LegalNoticeCaptio
HKLM, SOFTWARE\Microsoft\Windows NT\CurrentVersion\Winlogon, LegalNoticeText
HKLM, SOFTWARE\Classes\scrfile, InfoTip
HKLM, SOFTWARE\Classes\scrfile, NeverShowExt
HKLM, SOFTWARE\Classes\scrfile, TileInfo
HKCU, Software\Microsoft\Windows\CurrentVersion\Policies\System,DisableRegistryTools
HKCU, Software\Microsoft\Windows\CurrentVersion\Policies\Explorer,NoFolderOptions
HKLM, SOFTWARE\Microsoft\Windows NT\CurrentVersion\Image File Execution Options\Msconfig.exe
HKLM, SOFTWARE\Microsoft\Windows NT\CurrentVersion\Image File Execution Options\regedit.exe
HKLM, SOFTWARE\Microsoft\Windows NT\CurrentVersion\Image File Execution Options\taskmgr.exe

*******************************************************************************************************

Right Click the file and then choose "Install"


STEP 5:

Delete the Virus
How to Delete the Virus :
First open Windows Explorer or press (Ctrl + E)
Go to C:\Document and Settings\%username%\Start Menu\Programs\Startup\
Delete Adobe Online.com and Adobe Update.com
Delete folder with size +/- 40Kb, "autorun.inf", "Thumbs.com", and "Thumbs.db" within all drive


STEP 6:

Show Hidden Files
How to Show Hidden Files :
Open Command Prompt
Type:  attrib -s -h /s /d and press enter ( Note : Do it on all drives )
For Example:    C:\attrib -s -h /s /d
                        D:\attrib -s -h /s /d


>> Restart your computer before the changes that you make affect.


Note:
This virus generally reaches to your computer through any USB drive (Pen drive or Hard disc). Whenever you plug your USB drive into any other PC, infected with this virus, the virus will infect this drive and will infect the next computer, in which the drive is plugged in next time. So it’s always advisable not to open the drives directly (USB Pen drive or Hard disk does not open with double click). Instead always right click on the drive and select open option. If at all you see the first option as “autorun”, after you right click on the USB drive, this means that the drive is infected; it means that it is infected with some virus or it was infected with some virus but the autorun.inf is still in the directory of your USB device.

That's all.

Search Terms : How to, Remove SURABAYA-81u3f4nt45y-24-01-2007 Virus, Surabaya (81u3f4nt45y - 24.01.2007, booting virus, Removal 81u3f4nt45y Virus, message "81u3f4nt45y, virus 81u3f4nt45y, Virus surabaya 81u3f4nt45y, W32/VBWorm, Virus BlueFantasy 81u3f4nt45y, Fix "81u3f4nt45y-24-01-2007 surabaya virus", Worm/VB.bdy, W32/Drowor.worm,  [REMOVED]k1m0" Worm, W32.Drower, Surabaya in my birthday


CAUTION! : These tips and tricks are advanced, we can not guarantee that you will be able to solve your problem that result from using tips and tricks incorrectly and is used at your own risk.
Category: Tips & Tricks
Operating System : Windows

October 31, 2011

 Disable Drives in My Computer from Unknown User


How to Disable Drives in My Computer from unknown user

Security of your data is the most important thing for every person, what would be the security of data in a computer which have multiple users on the PC in your home. Every user have access to every bit in the computer and hence computer had never been personal unless its exclusively used by you alone Lets tweak the computer to disable drives where you can keep all those valuables and hide it from the external users. That's only you, who can handle the data even in a shared computer.


If you want to prevent all users who want access to your computer or network shared drives on the workstation, then you can hide the all drives as C: /, D: /, E:/,  and save your data from any unknown user. But the next time you can turn on the display of these drives with the Registry Editor. Now edit the computer registry to turn off the display of drives.

Follow the given steps below
First Click Start Button > Click Run.
Go to Run box and type regedit hit Enter Key
Then locate the following key
HKEY_CURRENT_USER\Software\Microsoft\Windows\CurrentVersion\Policies\Explorer


In the right side pane, create a new DWORD value name it disabledrives then Double click the value,

click on Decimal for the Base Unit.

For specific drive use values (For example: for A, B, C, D, E, F, G, H drives, the values are 1, 2, 4, 8, 16, 32, 64, and 128 respectively)
A = 1
B = 2
C = 4
D = 8
E = 16
F = 32
G = 64
H = 128

In this case we are trying to hide C drive, so we modify the value data box to 4 or to hide F drive, we modify the value data box to 32.

Now if you want to hide all the system drives then modify value data to 3FFFFFF.
Set it to the DWORD Value 3FFFFFF (Hexadecimal)


You can also hide multiple drives by adding the numbers of the particular drives simultaneously ( For example: if you want to hide drive C and drive G, you would type in number 68, which is 4+64)
Close the Registry Editor.

You'll need to reboot your computer before the changes take effect.


When you want to get your drives back, change the value of disableDrives to 0 or simply delete the value or delete the whole DWORD item.


Note:- This trick also work in Vista Home Edition.


That's all.

Search Terms: Disable Drives, Disable Drives in My Computer, Unknown User, How to Disable Drives, Disabling Drives In My Computer, Disable all Drives, How to Disable computer Drives, How to Disable hard Drives, Disable My Computer,


CAUTION! : It is recommends that before you attempt to use the registry editor, make sure that you back up the whole registry or export the registry keys in the registry that you plan to edit. Incorrectly editing the registry may damage your system. Use Registry Editor at your own risk, we cannot guarantee that you can solve problems that result from using Registry Editor incorrectly.

Category: Registry Tweaks
Operating System : Windows

August 29, 2011

 How to Automatically Refresh System Screen


How to Automatically Refresh System Screen:

If you are working on a computer and want to make changes to refresh your computer system automatically. For example, some times you watch sports scores, stock quotes, online exchanges and any changes to your computer system, but these changes are normally when the contents of a window change you may need to wait a few seconds, or press the F5 key on your keyboard. To refresh your screen automatically, you must edit your windows registry.

Follow the given steps to refresh the screen automatically.
First Click Start Button >  and then click Run.
Run box will appear.
In the Run box, type regedit and then click OK.
Then locate the following key in the registry
HKEY_LOCAL_MACHINE\SYSTEM\CurrentControlSet\Control\Update


In the right side panel choose the “UpdateMode” and double click the DWORD value


Set it to the DWORD Value between 1 and 5 > Click OK Button.
Close the registry editor.
You'll need to reboot your computer before the changes take effect.


That's all.

CAUTION! : It is recommends that before you attempt to use the registry editor, make sure that you back up the whole registry or export the registry keys in the registry that you plan to edit. Incorrectly editing the registry may damage your system. Use Registry Editor at your own risk, we cannot guarantee that you can solve problems that result from using Registry Editor incorrectly.

Category: Registry Tweaks
Operating System : Windows

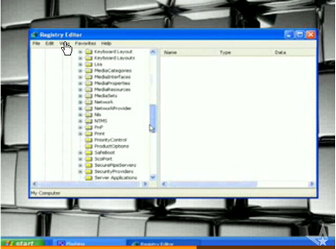
 Automatically Refresh System Screen - Video


This video will show you How to Automatically Refresh Your System Screen 

If you're having trouble playing videos, we suggest you to install the latest version of the Adobe Flash player.

If you're seeing the "You need to upgrade your Adobe Flash Player to watch this video / Missing Plug-in" error,

First you can upgrade the latest version of “Adobe Flash Player” after that view/play video’s.

Get the latest Adobe Flash Player (Download Adobe Flash Player)

August 24, 2011

 How to Change the Company Name and Registered Owner in Windows


How to Change the Company Name and Registered Owner in Windows.

In this article, I will tell you how to change the Registered name and organization in Windows XP and Vista using the registry
This trick is useful if you incorrectly entered value at the time of Windows installation.
 

Simply do the following steps
First Click Start Button > and then click Run.
Run box will appear.
In the Run box, type regedit and then click OK.

Then locate the following key in the registry
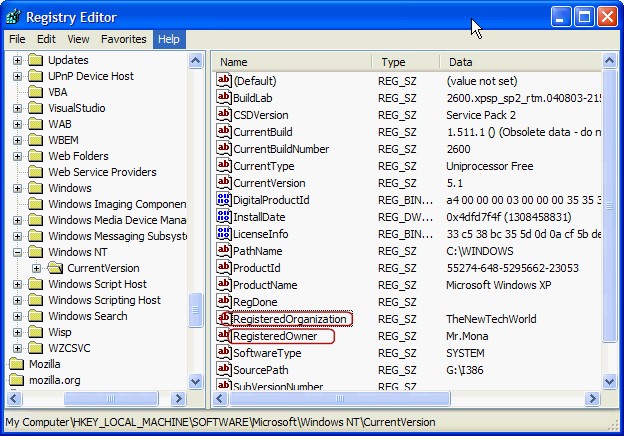
HKEY_LOCAL_MACHINE\SOFTWARE\Microsoft\Windows NT\CurrentVersion


Find the String value “RegisteredOwner” and double click it, type the name that you want, and then click OK.


And next  find the String value “RegisteredOrganization” and double click it, type the name that you want, and then click OK.


Close the registry editor.
Finally Right click the My Computer > Click Properties


you can see the changes you made.
This trick will works on Windows Vista as well.


> You have no idea how to fix this problem automatically please download Microsoft fix it tool.
That's all.

CAUTION! : It is recommends that before you attempt to use the registry editor, make sure that you back up the whole registry or export the registry keys in the registry that you plan to edit. Incorrectly editing the registry may damage your system. Use Registry Editor at your own risk, we cannot guarantee that you can solve problems that result from using Registry Editor incorrectly.

Category: Registry Tweaks
Operating System : Windows

July 29, 2011

 How to Disable USB Mass Storage Devices


How to Disable or Enable access to USB Storage Devices

A common security anxiety at organizations allows users to connect a USB flash drive, because it can so easily copy the data. You can completely disable USB devices on writing, using a simple trick to disable USB devices. You must ensure that users are not administrators on the computer, for the reason that they can easily modify this setting back.

Follow the steps given below to disable the access to USB devices
First Click Start Button >  Click Run.
In the Run box, type regedit and then click OK.
Then locate the following key in the registry
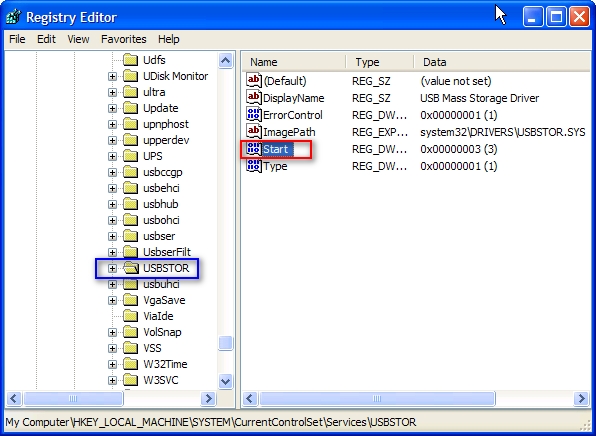
HKEY_LOCAL_MACHINE\SYSTEM\CurrentControlSet\Services\USBSTOR


In the right side panel, double click on the value start then set it a Hexadecimal value data 4.
And then click OK. (The default value is 3)


If you want to re-enable the USB ports set it a Hexadecimal value data 3.
Close the registry editor.
You'll need to reboot your computer before the changes take effect.
This trick will works on Windows Vista as well.

That's all.

CAUTION! : It is recommends that before you attempt to use the registry editor, make sure that you back up the whole registry or export the registry keys in the registry that you plan to edit. Incorrectly editing the registry may damage your system. Use Registry Editor at your own risk, we cannot guarantee that you can solve problems that result from using Registry Editor incorrectly.

Category: Registry Tweaks
Operating System : Windows
Your Ad Here